Difference between revisions of "PublicHome/Software/Products/SplTools"
| (27 intermediate revisions by the same user not shown) | |||
| Line 24: | Line 24: | ||
SpartanLync Map is a Mobile, Tablet and Desktop Web Application companion to SpartanLync Tools that allows MyGetoab users to | SpartanLync Map is a Mobile, Tablet and Desktop Web Application companion to SpartanLync Tools that allows MyGetoab users to | ||
<ol style="list-style-type:lower-alpha"> | <ol style="list-style-type:lower-alpha"> | ||
| − | <li>View their fleet of vehicles in real-time on a map</li> | + | <li>View their fleet of vehicles in real-time on a map.<p>The map used to monitor vehicle location can be either from (1) the MyGeotab Map page or (2) A independent full-screen map</li> |
or to | or to | ||
<li>Playback the location of vehicles in their fleet at points of time in the past</li> | <li>Playback the location of vehicles in their fleet at points of time in the past</li> | ||
| Line 31: | Line 31: | ||
<gallery mode="packed" heights="250px"> | <gallery mode="packed" heights="250px"> | ||
| − | File: | + | File:SplMap-Mobile.jpg|View Sensor Types detected in Fleet Vehicles |
| − | File: | + | File:SplMap-Mobile-SensorData.jpg|View detailed real-time Sensor data on a Vehicle |
| + | File:MyGeotabMap.jpg|View SpartanLync Sensor information from Fleet Vehicles on the MyGeotab Map page | ||
</gallery> | </gallery> | ||
| − | == | + | ==Installing SpartanLync Tools / Map into a Geotab Database== |
SpartanLync Tools and SpartanLync Map requires a Geotab database from which to operate. | SpartanLync Tools and SpartanLync Map requires a Geotab database from which to operate. | ||
| − | + | '''**Important**''' To use SpartanLync Map, SpartanLync Tools '''MUST FIRST be installed and run''' using the steps below: | |
===Step 1.=== | ===Step 1.=== | ||
| Line 45: | Line 46: | ||
===Step 2.=== | ===Step 2.=== | ||
| − | Install the '''SpartanLync Tools''' Add-in using the JSON code below. This code is copy/pasted into the following MyGeotab screen <strong class="tiny">( Administration -> System -> System Settings -> Add-Ins Tab -> New Add-In button )</strong> and then SAVE the changes. | + | Install the '''SpartanLync Tools''' Add-in using the JSON code below. |
| + | |||
| + | This code is copy/pasted into the following MyGeotab screen <strong class="tiny">( Administration -> System -> System Settings -> Add-Ins Tab -> New Add-In button )</strong> and then SAVE the changes. | ||
<pre> | <pre> | ||
| Line 64: | Line 67: | ||
===Step 3.=== | ===Step 3.=== | ||
| − | Run '''SpartanLync Tools''' from the left-side | + | Run '''SpartanLync Tools''' from the MyGeotab left-side navigation by clicking its menu item ( [[File:Spartanlync-menu-tools.svg|frameless|30x30px]] ). |
===Step 4.=== | ===Step 4.=== | ||
| + | Install the '''SpartanLync Map''' Add-in using the JSON code below. | ||
| + | |||
| + | This code is copy/pasted into the following MyGeotab screen <strong class="tiny">( Administration -> System -> System Settings -> Add-Ins Tab -> New Add-In button )</strong> and then SAVE the changes. | ||
| + | |||
| + | <pre> | ||
| + | { | ||
| + | "name": "SpartanLync Map", | ||
| + | "supportEmail": "support@spartanlync.com", | ||
| + | "version": "1.0.1.01", | ||
| + | "items": [{ | ||
| + | "icon": "https://help.spartansense.com/geotab/splmap/img/spartanlync-map-menu.svg", | ||
| + | "url": "https://help.spartansense.com/geotab/splmap/index.html", | ||
| + | "path": "", | ||
| + | "menuName": { | ||
| + | "en": "SpartanLync Map" | ||
| + | } | ||
| + | }], | ||
| + | "isSigned": false | ||
| + | } | ||
| + | </pre> | ||
| + | |||
| + | ===Step 5.=== | ||
| + | Run '''SpartanLync Map''' from the MyGeotab left-side navigation by clicking its menu item ( [[File:Spartanlync-menu-map.svg|frameless|30x30px]] ). | ||
| + | |||
| + | ===Step 6.=== | ||
| + | First-time installations of SpartanLync Map will be shown the option of further installing SpartanLync into MyGeotab Map. | ||
| + | [[File:SplMap-WizardInstallSplGeotabMap.jpg|alt=|none|thumb|543x543px]] | ||
| + | If the '''Not Now''' option was chosen; At a later time, Administrator users can click the '''"Install for Everyone"''' button in the SpartanLync icon ( [[File:Spartanlync-logo.svg|frameless|30x30px]] ) menu to install for everyone in the Geotab database. | ||
| + | |||
| + | [[File:SplMap-ManualInstallSplGeotabMap.jpg|frameless|543x543px]] | ||
| + | |||
| + | Once SpartanLync is installed into MyGeotab Map, any user in MyGeotab can choose to individually remove SpartanLync from their Map page by clicking the '''"Remove My Account Only"''' button in the SpartanLync icon ( [[File:Spartanlync-logo.svg|frameless|30x30px]] ) menu. | ||
| + | |||
| + | ===Step 7.=== | ||
| + | In SpartanLync Map, to view vehicles from your fleet on the map each user must first add their preferred vehicle(s) manually. <p> They must use the vehicle configuration panel to search for and add vehicle(s) that are within their MyGeotab database they have the privileges to access.<p> | ||
| + | As Follows: | ||
| + | # Open Configuration Panel | ||
| + | # On Vehicle Tab, Search for desired vehicle(s) | ||
| + | # Click a vehicle from search results to Add to Vehicle Tab | ||
| + | # Vehicle(s) with SpartanLync sensors will show a TempTrac/TPMS button.<br />Click button to view sensor details | ||
| + | |||
| + | [[File:SplMap-Mobile-Guide-AddVehicle.jpg|frameless|1000x555px]] | ||
==SpartanLync Tools Documents== | ==SpartanLync Tools Documents== | ||
| Line 77: | Line 122: | ||
===Sites=== | ===Sites=== | ||
| − | *[https://my.geotab.com/ MyGeotab | + | *[https://my.geotab.com/ MyGeotab Portal] |
| − | |||
__NOTOC__ | __NOTOC__ | ||
Latest revision as of 17:51, 28 October 2020
SpartanLync Tools (MyGeotab App Integration) documentation available to SpartanLync Customers and Partners
What is SpartanLync Tools
SpartanLync Tools is a Mobile, Tablet and Desktop Web Application that operates as a MyGetoab plugin, technically called an Add-In, within the MyGeotab platform.
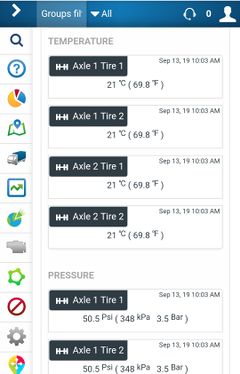
SpartanLync Tools gives Geotab customers the ability to Discover, Monitor, and Report on SpartanLync devices and sensors installed into fleets of vehicles installed with a Geotab GO device.
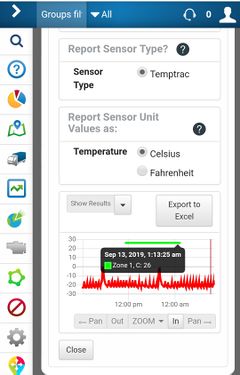
The app graphically and tabularily reports on SpartanLync TPMS / Temptrac Pressure and Temperature sensor data values. The current or historical sensor data can then be exported for CSV download into Excel.
Additionally, real-time vehicle location and fault history is easily shown for installation troubleshooting and fleet monitoring.
What is SpartanLync Map
SpartanLync Map is a Mobile, Tablet and Desktop Web Application companion to SpartanLync Tools that allows MyGetoab users to
- View their fleet of vehicles in real-time on a map.
The map used to monitor vehicle location can be either from (1) the MyGeotab Map page or (2) A independent full-screen map
or to
- Playback the location of vehicles in their fleet at points of time in the past
Additionally, Vehicle Status and Exception events can also be viewed in real-time.
Installing SpartanLync Tools / Map into a Geotab Database
SpartanLync Tools and SpartanLync Map requires a Geotab database from which to operate.
**Important** To use SpartanLync Map, SpartanLync Tools MUST FIRST be installed and run using the steps below:
Step 1.
A Geotab customer with Administrator privileges must first log into theor Geotab fleet database using the web-based MyGeotab fleet management software.
Step 2.
Install the SpartanLync Tools Add-in using the JSON code below.
This code is copy/pasted into the following MyGeotab screen ( Administration -> System -> System Settings -> Add-Ins Tab -> New Add-In button ) and then SAVE the changes.
{
  "name": "SpartanLync Tools",
  "supportEmail": "support@spartanlync.com",
  "version": "1.0.1.01",
  "items": [{
    "url": "https://help.spartansense.com/geotab/spltools/splgeotabtools.html",
    "path": "",
    "menuName": {
      "en": "SpartanLync Tools"
    },
    "icon": "https://help.spartansense.com/geotab/spltools/images/spartanlync-tools-menu.svg"
  }]
}
Step 3.
Run SpartanLync Tools from the MyGeotab left-side navigation by clicking its menu item ( ).
Step 4.
Install the SpartanLync Map Add-in using the JSON code below.
This code is copy/pasted into the following MyGeotab screen ( Administration -> System -> System Settings -> Add-Ins Tab -> New Add-In button ) and then SAVE the changes.
{
  "name": "SpartanLync Map",
  "supportEmail": "support@spartanlync.com",
  "version": "1.0.1.01",
  "items": [{
    "icon": "https://help.spartansense.com/geotab/splmap/img/spartanlync-map-menu.svg",
    "url": "https://help.spartansense.com/geotab/splmap/index.html",
    "path": "",
    "menuName": {
      "en": "SpartanLync Map"
    }
  }],
  "isSigned": false
}
Step 5.
Run SpartanLync Map from the MyGeotab left-side navigation by clicking its menu item ( ).
Step 6.
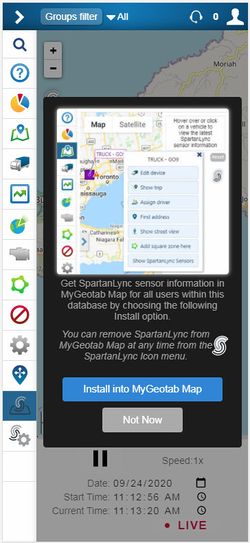
First-time installations of SpartanLync Map will be shown the option of further installing SpartanLync into MyGeotab Map.
If the Not Now option was chosen; At a later time, Administrator users can click the "Install for Everyone" button in the SpartanLync icon ( ) menu to install for everyone in the Geotab database.
Once SpartanLync is installed into MyGeotab Map, any user in MyGeotab can choose to individually remove SpartanLync from their Map page by clicking the "Remove My Account Only" button in the SpartanLync icon ( ) menu.
Step 7.
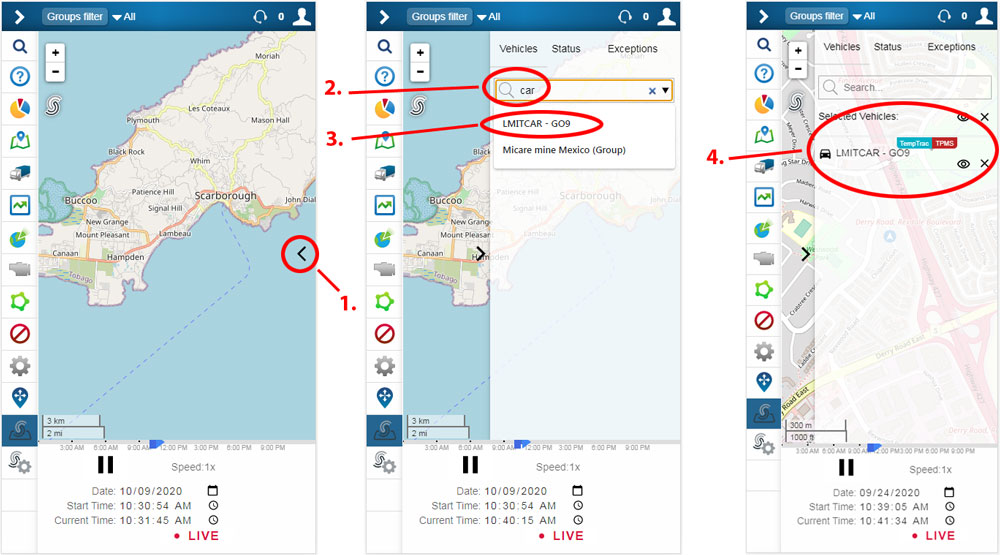
In SpartanLync Map, to view vehicles from your fleet on the map each user must first add their preferred vehicle(s) manually.
They must use the vehicle configuration panel to search for and add vehicle(s) that are within their MyGeotab database they have the privileges to access.
As Follows:
- Open Configuration Panel
- On Vehicle Tab, Search for desired vehicle(s)
- Click a vehicle from search results to Add to Vehicle Tab
- Vehicle(s) with SpartanLync sensors will show a TempTrac/TPMS button.
Click button to view sensor details
SpartanLync Tools Documents
Product / Support / F.A.Q
- FAQ - Frequently Asked Questions
- TBA - SpartanLync Tools User Guide


